How to open office 2007 files into Office 2003
Today tip will help you to resolve the compatibility issues between the Office 2003 and Office 2007. Because all programs in office 2003 used the old file extensions for its different programs. For example Word 2003 saved files with extension .doc, Excel 2003 with .xls and PowerPoint with .ppt. but on the other office 2007 used the new file extensions for its different programs. For example Word 2007 saved files with extension .docx, Excel 2007 with .xlsx and PowerPoint with .pptx. Now the problem is that when you will try to open office 2007 files into office 2003 and you will not open the file due to compatibility issues between both office versions. Microsoft provides a free compatibility pack to convert office 2007 documents to the office 2003 format. There are many third party free converter are available but here we are using Microsoft office compatibility pack.
Follow the given steps to download free Microsoft compatibility pack and install it.
To use this feature, you will need to be logged into your computer with administrative rights.
Visit the following link to download the Microsoft compatibility pack:
http://www.microsoft.com/downloads/details.aspx?FamilyId=941b3470-3ae9-4aee-8f43-c6bb74cd1466&displaylang=en
COMMAND PROMPT ON RIGHT CLICK
Command Prompt on Right-Click
Many computer users, specially the programmers, need to launch a command prompt window every once in a while to execute some dos/shell commands. The problem is, when a command prompt window launched, the default path is normally the system path or the user profile's path. The users will then have to do all the "cd" commands to change the directories to the path he/she wants.
This trick shows you how to add an option called "Command Prompt" when you right-click on a folder in Windows. With this option, a Command Prompt Window will launch and its current directory will be the path to the folder you've selected.
Use this trick at your own risk.
Here's what you'll get:
The Solution
You can either edit your registry OR download the registry file and apply it on your computer.
Method I. Manually edit the registry:
1.Start > Run
2.Enter "regedit" and hit Enter
3.Expand to "HKEY_LOCAL_MACHINE\SOFTWARE\Classes\Folder\shell"
4.Right-click on "shell" and select New > Key
5.Make sure a new key is created under "shell". Change the name of this key to "Command Prompt"
6.Right-click on this new key "Command Prompt" and select New > Key
7.Change the name of this key to "command"
8.Here's what we should have:
9.Double-click on the "(Default)" text on the right window to bring up the edit box
10.Enter this text into the Value Data field:
cmd.exe "%1"
11.Click OK and close the registry.
Many computer users, specially the programmers, need to launch a command prompt window every once in a while to execute some dos/shell commands. The problem is, when a command prompt window launched, the default path is normally the system path or the user profile's path. The users will then have to do all the "cd" commands to change the directories to the path he/she wants.
This trick shows you how to add an option called "Command Prompt" when you right-click on a folder in Windows. With this option, a Command Prompt Window will launch and its current directory will be the path to the folder you've selected.
Use this trick at your own risk.
Here's what you'll get:
The Solution
You can either edit your registry OR download the registry file and apply it on your computer.
Method I. Manually edit the registry:
1.Start > Run
2.Enter "regedit" and hit Enter
3.Expand to "HKEY_LOCAL_MACHINE\SOFTWARE\Classes\Folder\shell"
4.Right-click on "shell" and select New > Key
5.Make sure a new key is created under "shell". Change the name of this key to "Command Prompt"
6.Right-click on this new key "Command Prompt" and select New > Key
7.Change the name of this key to "command"
8.Here's what we should have:
9.Double-click on the "(Default)" text on the right window to bring up the edit box
10.Enter this text into the Value Data field:
cmd.exe "%1"
11.Click OK and close the registry.
HOW TO OPERATE MOUSE POINTER WITHOUT MOUSE
How to Operate Mouse Pointer Without Mouse
This trick is a user contributed. The information might have been copied and pasted exactly as what user posted.
Proceed at your own risks.
You have Mouse Problem ?? No Problem
I will give you suggestion
Press Left Alt + Left Shift + Num Lock Button + Ok
with the help of Numeric Keypad e.g ( Press and Hold the following Keys )
7 8 9
4 6
1 2 3
For Normal Click Press 5
Default
Left Alt + Left Shift + Num Lock
This trick is a user contributed. The information might have been copied and pasted exactly as what user posted.
Proceed at your own risks.
You have Mouse Problem ?? No Problem
I will give you suggestion
Press Left Alt + Left Shift + Num Lock Button + Ok
with the help of Numeric Keypad e.g ( Press and Hold the following Keys )
7 8 9
4 6
1 2 3
For Normal Click Press 5
Default
Left Alt + Left Shift + Num Lock
HIDE ALL DRIVES FROM MY COMPUTER
Hide all drives from My Computer
This trick is a user contributed. The information might have been copied and pasted exactly as what user posted.
Proceed at your own risks.
How to Hide the drives(c:,d:,e:,...etc) in Ur Computer
This is a great trick you can play on your friends. To disable the display of local or networked drives when you click My Computer.
1.Go to Start -> Run.
2.Type regedit
3.Now go to: HKEY_CURRENT_USER\Software\Microsoft\Windows\CurrentVersion\Policies\Explorer
4.Now in the right pane, create a new DWORD item and name it NoDrives (it is case sensitive).
5.Now modify it's value and set it to 3FFFFFF (Hexadecimal) .
6.Now restart your computer.
7.So, now when you click on My Computer, no drives will be shown(all gone...).
To enable display of drives in My Computer, simply delete this DWORD item that you created. Again restart your computer. You can now see all the drives again.
This trick is a user contributed. The information might have been copied and pasted exactly as what user posted.
Proceed at your own risks.
How to Hide the drives(c:,d:,e:,...etc) in Ur Computer
This is a great trick you can play on your friends. To disable the display of local or networked drives when you click My Computer.
1.Go to Start -> Run.
2.Type regedit
3.Now go to: HKEY_CURRENT_USER\Software\Microsoft\Windows\CurrentVersion\Policies\Explorer
4.Now in the right pane, create a new DWORD item and name it NoDrives (it is case sensitive).
5.Now modify it's value and set it to 3FFFFFF (Hexadecimal) .
6.Now restart your computer.
7.So, now when you click on My Computer, no drives will be shown(all gone...).
To enable display of drives in My Computer, simply delete this DWORD item that you created. Again restart your computer. You can now see all the drives again.
WINDOWS 7 - THE BLACK BOX RECORDER
The Black Box Recorder

Every developer wishes there was a way that an end-users could quickly and simply record a repro for the problem that they’re running into that is unique to their machine. Windows 7 comes to the rescue! Part of the in-built diagnostic tools that we use internally to send feedback on the product, the Problem Steps Recorder provides a simple screen capture tool that enables you to record a series of actions. Once you hit “record”, it tracks your mouse and keyboard and captures screenshots with any comments you choose to associate alongside them. Once you stop recording, it saves the whole thing to a ZIP file, containing an HTML-based “slide show” of the steps. It’s a really neat little tool and I can’t wait for it to become ubiquitous on every desktop! The program is called psr.exe; you can also search for it from Control Panel under “Record steps to reproduce a problem”.

Every developer wishes there was a way that an end-users could quickly and simply record a repro for the problem that they’re running into that is unique to their machine. Windows 7 comes to the rescue! Part of the in-built diagnostic tools that we use internally to send feedback on the product, the Problem Steps Recorder provides a simple screen capture tool that enables you to record a series of actions. Once you hit “record”, it tracks your mouse and keyboard and captures screenshots with any comments you choose to associate alongside them. Once you stop recording, it saves the whole thing to a ZIP file, containing an HTML-based “slide show” of the steps. It’s a really neat little tool and I can’t wait for it to become ubiquitous on every desktop! The program is called psr.exe; you can also search for it from Control Panel under “Record steps to reproduce a problem”.
WINDOWS 7 DISPLAY PROJECTION
Display Projection
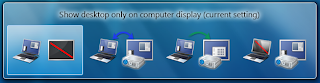
Had enough of messing around with weird and wonderful OEM display driver utilities to get your notebook display onto an external projector? In that case, you’ll be pleased to know that projection is really quick and simple with Windows 7. Just hit Win+P, and you’ll be rewarded by the following pop-up window:
Use the arrow keys (or keep hitting Win+P) to switch to “clone”, “extend” or “external only” display settings. You can also access the application as displayswitch.exe.
If you want broader control over presentation settings, you can also press Win+X to open the Windows Mobility Center, which allows you to turn on a presentation “mode” that switches IM clients to do not disturb, disables screensavers, sets a neutral wallpaper etc. (Note that this feature is also available in Windows Vista.)

Had enough of messing around with weird and wonderful OEM display driver utilities to get your notebook display onto an external projector? In that case, you’ll be pleased to know that projection is really quick and simple with Windows 7. Just hit Win+P, and you’ll be rewarded by the following pop-up window:
Use the arrow keys (or keep hitting Win+P) to switch to “clone”, “extend” or “external only” display settings. You can also access the application as displayswitch.exe.
If you want broader control over presentation settings, you can also press Win+X to open the Windows Mobility Center, which allows you to turn on a presentation “mode” that switches IM clients to do not disturb, disables screensavers, sets a neutral wallpaper etc. (Note that this feature is also available in Windows Vista.)
SECURE WINDOWS 7
"SECURE WINDOWS 7"
No phishing allowed
The SmartScreen® Filter helps protect you from phishing scams and from Web sites that attempt to download malicious software to your PC.
Easy encryption
Use BitLocker To Go to encrypt removable USB devices and external disks. Right-click the drive in Windows Explorer, and click Turn on BitLocker. (IT administrators can manage this feature centrally using Group Policy.)
A little privacy, please
Internet Explorer 8, prevents the browser from retaining browsing history, temporary Internet files, form data, cookies, and usernames and passwords. In Internet Explorer 8, click Tools, and then click
No phishing allowed
The SmartScreen® Filter helps protect you from phishing scams and from Web sites that attempt to download malicious software to your PC.
Easy encryption
Use BitLocker To Go to encrypt removable USB devices and external disks. Right-click the drive in Windows Explorer, and click Turn on BitLocker. (IT administrators can manage this feature centrally using Group Policy.)
A little privacy, please
Internet Explorer 8, prevents the browser from retaining browsing history, temporary Internet files, form data, cookies, and usernames and passwords. In Internet Explorer 8, click Tools, and then click
WINDOWS 7 TIPS & TRICS
"TAKE CONTROL OF YOUR DESKTOP"
Kill the clutter
Press Windows logo key + HOME to minimize all inactive windows. Press Windows logo key + HOME again to restore the windows when you want them.
Personalize it
Set up your Windows 7 desktop background to shuffle through your favorite images. Right-click your desktop, click Personalize, and then click Desktop Background. Select the Shuffle check box, and then select the images you want to shuffle through.
Get a grip on your gadgets:
With Windows 7, gadgets are easier to manage and use. Position them anywhere on the desktop, and resize them to your heart’s content. They’ll snap in place at the edge of the screen. To change gadget options, right-click on the desktop and select Gadgets.
Windows 7 Aero Peek
Click the small rectangle in the lower-right corner (or Windows logo key + SPACEBAR) to peek at the icons and gadgets on your desktop.
Come to order
To auto-arrange your desktop icons according to your default settings, press and hold the F5 key. Windows 7 immediately restores order.
Favorite pin-ups
Pin the folders you use most onto your taskbar. Simply hold your mouse over the folder, right-click, and drag the folder onto the taskbar for easy access.
Clean up your taskbar
Just right-click any icon on the taskbar, and click Unpin this program from the taskbar.
It’s a stick-up
Put your sticky notes right on your Windows 7 desktop. On the Start menu, click All Programs > Accessories > Sticky Notes. Right-click the note to change its color, or click the PLUS SIGN to create another note.
Shake things up
Windows 7 Aero® Shake clears the inactive windows from your desktop. Rest your mouse pointer over the window title bar, click, and shake the window from side to side. Repeat the procedure to shake everything back into view.
"CONNECT MORE EASILY"
Be a joiner
Use the Join Domain or Workgroup Wizard to easily join the corporate domain. The entire process is more secure than ever. Enter your network credentials, and within minutes, you’ve joined your workplace domain.
Remote control
With DirectAccess, you can connect to the corporate network without having to use a virtual private network (VPN). IT departments can use DirectAccess to administer remote PCs that are connected to the Internet.
Networking made easy
With Windows 7, you can set up secure home networks to share photos, files, and even printers. Click the Windows flag in the lower-left corner of the screen, type HomeGroup in the search box, and click the result. Start the HomeGroup Wizard, and choose what you want to share.
Look, no wires!
Wireless setup is easier than ever with Windows 7. Start the Add a device wizard, type in the PIN, and your device is automatically connected. Add printers, storage devices, and even digital media players to your network in just a few steps.
Going mobile
With Windows 7, it is simpler than ever to connect your computer to the Internet by using a wireless data card, no matter which cellular provider you use. Drivers for the data card are installed the first time you use it, and the process is similar to connecting to any other wireless network.
Faster, smoother data transfer
BranchCache™ in Windows 7 can help an enterprise reduce bandwidth use and increase responsiveness when accessing documents, Web pages, and videos stored on file servers and intranet sites that run Windows Server® 2008 R2. © 2009 Microsoft Corporation All Rights Reserved 4
Kill the clutter
Press Windows logo key + HOME to minimize all inactive windows. Press Windows logo key + HOME again to restore the windows when you want them.
Personalize it
Set up your Windows 7 desktop background to shuffle through your favorite images. Right-click your desktop, click Personalize, and then click Desktop Background. Select the Shuffle check box, and then select the images you want to shuffle through.
Get a grip on your gadgets:
With Windows 7, gadgets are easier to manage and use. Position them anywhere on the desktop, and resize them to your heart’s content. They’ll snap in place at the edge of the screen. To change gadget options, right-click on the desktop and select Gadgets.
Windows 7 Aero Peek
Click the small rectangle in the lower-right corner (or Windows logo key + SPACEBAR) to peek at the icons and gadgets on your desktop.
Come to order
To auto-arrange your desktop icons according to your default settings, press and hold the F5 key. Windows 7 immediately restores order.
Favorite pin-ups
Pin the folders you use most onto your taskbar. Simply hold your mouse over the folder, right-click, and drag the folder onto the taskbar for easy access.
Clean up your taskbar
Just right-click any icon on the taskbar, and click Unpin this program from the taskbar.
It’s a stick-up
Put your sticky notes right on your Windows 7 desktop. On the Start menu, click All Programs > Accessories > Sticky Notes. Right-click the note to change its color, or click the PLUS SIGN to create another note.
Shake things up
Windows 7 Aero® Shake clears the inactive windows from your desktop. Rest your mouse pointer over the window title bar, click, and shake the window from side to side. Repeat the procedure to shake everything back into view.
"CONNECT MORE EASILY"
Be a joiner
Use the Join Domain or Workgroup Wizard to easily join the corporate domain. The entire process is more secure than ever. Enter your network credentials, and within minutes, you’ve joined your workplace domain.
Remote control
With DirectAccess, you can connect to the corporate network without having to use a virtual private network (VPN). IT departments can use DirectAccess to administer remote PCs that are connected to the Internet.
Networking made easy
With Windows 7, you can set up secure home networks to share photos, files, and even printers. Click the Windows flag in the lower-left corner of the screen, type HomeGroup in the search box, and click the result. Start the HomeGroup Wizard, and choose what you want to share.
Look, no wires!
Wireless setup is easier than ever with Windows 7. Start the Add a device wizard, type in the PIN, and your device is automatically connected. Add printers, storage devices, and even digital media players to your network in just a few steps.
Going mobile
With Windows 7, it is simpler than ever to connect your computer to the Internet by using a wireless data card, no matter which cellular provider you use. Drivers for the data card are installed the first time you use it, and the process is similar to connecting to any other wireless network.
Faster, smoother data transfer
BranchCache™ in Windows 7 can help an enterprise reduce bandwidth use and increase responsiveness when accessing documents, Web pages, and videos stored on file servers and intranet sites that run Windows Server® 2008 R2. © 2009 Microsoft Corporation All Rights Reserved 4
WINDOWS 7 KEYBOARD SHORTCUT KEYS
F2 Rename the selected item
F1 Displays Help
Ctrl + C - Copy the selected item
Ctrl + X - Cut the selected item
Ctrl + V - Paste the selected item
Ctrl + Z - Undo an action
Ctrl + Y - Redo an action
Ctrl + Right Arrow - Move the cursor to the beginning of the next word
Ctrl + Left Arrow - Move the cursor to the beginning of the previous word
Ctrl + Down Arrow - Move the cursor to the beginning of the next paragraph
Ctrl + Up Arrow - Move the cursor to the beginning of the previous paragraph
Ctrl + Shift with an arrow key - Select a block of text
Shift with any arrow key - Select more than one item in a window or on the desktop, or select text within a document
Ctrl with any arrow key + Spacebar - Select multiple individual items in a window or on the desktop
Ctrl + A - Select all items in a document or window
F3 - Search for a file or folder
Alt + Enter - Display properties for the selected item
Alt + F4 - Close the active item, or exit the active program
Alt + Spacebar - Open the shortcut menu for the active window
Ctrl + F4 - Close the active document (in programs that allow you to have multiple documents open simultaneously)
Alt + Tab - Switch between open items
Ctrl + Alt + Tab - Use the arrow keys to switch between open items
Ctrl + Mouse scroll wheel - Change the size of icons on the desktop
Windows logo key + Tab - Cycle through programs on the taskbar by using Aero Flip 3-D
Ctrl + Windows logo key +Tab - Use the arrow keys to cycle through programs on the taskbar by using Aero Flip 3-D
Alt + Esc + Cycle through items in the order in which they were opened
F6 + Cycle through screen elements in a window or on the desktop
F4 - Display the address bar list in Windows Explorer
Shift + F10 - Display the shortcut menu for the selected item
Ctrl + Esc - Open the Start menu
Alt + underlined letter Display the corresponding menu
Alt + underlined letter Perform the menu command (or other underlined command)
F10 - Activate the menu bar in the active program
Right Arrow - Open the next menu to the right, or open a submenu
Left Arrow - Open the next menu to the left, or close a submenu
F5 - Refresh the active window
Alt + Up Arrow - View the folder one level up in Windows Explorer
Esc - Cancel the current task
Ctrl + Shift + Esc - Open Task Manager
Shift when you insert a CD
Delete - Delete the selected item and move it to the Recycle Bin
Shift + Delete - Delete the selected item without moving it to the Recycle Bin first
F1 Displays Help
Ctrl + C - Copy the selected item
Ctrl + X - Cut the selected item
Ctrl + V - Paste the selected item
Ctrl + Z - Undo an action
Ctrl + Y - Redo an action
Ctrl + Right Arrow - Move the cursor to the beginning of the next word
Ctrl + Left Arrow - Move the cursor to the beginning of the previous word
Ctrl + Down Arrow - Move the cursor to the beginning of the next paragraph
Ctrl + Up Arrow - Move the cursor to the beginning of the previous paragraph
Ctrl + Shift with an arrow key - Select a block of text
Shift with any arrow key - Select more than one item in a window or on the desktop, or select text within a document
Ctrl with any arrow key + Spacebar - Select multiple individual items in a window or on the desktop
Ctrl + A - Select all items in a document or window
F3 - Search for a file or folder
Alt + Enter - Display properties for the selected item
Alt + F4 - Close the active item, or exit the active program
Alt + Spacebar - Open the shortcut menu for the active window
Ctrl + F4 - Close the active document (in programs that allow you to have multiple documents open simultaneously)
Alt + Tab - Switch between open items
Ctrl + Alt + Tab - Use the arrow keys to switch between open items
Ctrl + Mouse scroll wheel - Change the size of icons on the desktop
Windows logo key + Tab - Cycle through programs on the taskbar by using Aero Flip 3-D
Ctrl + Windows logo key +Tab - Use the arrow keys to cycle through programs on the taskbar by using Aero Flip 3-D
Alt + Esc + Cycle through items in the order in which they were opened
F6 + Cycle through screen elements in a window or on the desktop
F4 - Display the address bar list in Windows Explorer
Shift + F10 - Display the shortcut menu for the selected item
Ctrl + Esc - Open the Start menu
Alt + underlined letter Display the corresponding menu
Alt + underlined letter Perform the menu command (or other underlined command)
F10 - Activate the menu bar in the active program
Right Arrow - Open the next menu to the right, or open a submenu
Left Arrow - Open the next menu to the left, or close a submenu
F5 - Refresh the active window
Alt + Up Arrow - View the folder one level up in Windows Explorer
Esc - Cancel the current task
Ctrl + Shift + Esc - Open Task Manager
Shift when you insert a CD
Delete - Delete the selected item and move it to the Recycle Bin
Shift + Delete - Delete the selected item without moving it to the Recycle Bin first
Hide 'User Accounts' from users
Go to Start/Run, and type: GPEDIT.MSC
Open the path
User Config > Admin Templates > Control Panel
doubleclick "Hide specified Control Panel applets"
put a dot in 'enabled', then click 'Show"
click Add button,
type "nusrmgt.cpl" into the add box
Open the path
User Config > Admin Templates > Control Panel
doubleclick "Hide specified Control Panel applets"
put a dot in 'enabled', then click 'Show"
click Add button,
type "nusrmgt.cpl" into the add box
Create Your Own Logon Message
Click Start, click Run, type regedit, and then click OK.
In the Registry Editor, drill down to the following key: HKEY_LOCAL_MACHINE\SOFTWARE\Microsoft\Windows NT\CurrentVersion\Winlogon
Right-click LegalNoticeCaption, click Modify, type My Windows XP Machine, and then click OK.
Right-click LegalNoticeText, click Modify, and then type your message.
Close the editor and your new message will appear at every log on.
This tip applies to computers that are part of a domain. For stand-alone or peer-to-peer networks, the custom screen appears just before the Welcome screen.
In the Registry Editor, drill down to the following key: HKEY_LOCAL_MACHINE\SOFTWARE\Microsoft\Windows NT\CurrentVersion\Winlogon
Right-click LegalNoticeCaption, click Modify, type My Windows XP Machine, and then click OK.
Right-click LegalNoticeText, click Modify, and then type your message.
Close the editor and your new message will appear at every log on.
This tip applies to computers that are part of a domain. For stand-alone or peer-to-peer networks, the custom screen appears just before the Welcome screen.
Create your own popup menu in the taskbar
You can create your own popup window other than START MENU in the taskbar.
Put all the shortcuts to the applications that you want to popup in a folder.
Then you right click on taskbar ->toolbars ->new toolbar -> and select the folder
Put all the shortcuts to the applications that you want to popup in a folder.
Then you right click on taskbar ->toolbars ->new toolbar -> and select the folder
Create your own Internet Explorer Toolbar
First, create your HTML file and place it in whatever folder is easiest for you to remember. ( I have a folder on my D drive called Desktop Toolbars. )
Go to: HKEY_LOCAL_MACHINE\SOFTWARE\Microsoft\Internet Explorer\AboutURLs
Create a new String Value with an easy to remember name.
Ex: TopToolbar ,BottomToolbar ,GoogleSearchPage
In the data for the new string value you've created, put the COMPLETE address for the HTML page you want to display in a toolbar.
Like this: D:\Desktop_Toolbars\TopBar.html
To show your new toolbar, right-click on your taskbar and choose "Toolbars" > New Toolbar.
In the box labeled Folder:, type about: with the name of the string value you created that represents the HTML file you want to see in your toolbar.
Like this:
about:TopBar
will display your D:\Desktop_Toolbars\TopBar.html in your taskbar.
about:BottomBar
about:GoogleSearchPage
See this screenshot for a visual example of something simple you can do
Go to: HKEY_LOCAL_MACHINE\SOFTWARE\Microsoft\Internet Explorer\AboutURLs
Create a new String Value with an easy to remember name.
Ex: TopToolbar ,BottomToolbar ,GoogleSearchPage
In the data for the new string value you've created, put the COMPLETE address for the HTML page you want to display in a toolbar.
Like this: D:\Desktop_Toolbars\TopBar.html
To show your new toolbar, right-click on your taskbar and choose "Toolbars" > New Toolbar.
In the box labeled Folder:, type about: with the name of the string value you created that represents the HTML file you want to see in your toolbar.
Like this:
about:TopBar
will display your D:\Desktop_Toolbars\TopBar.html in your taskbar.
about:BottomBar
about:GoogleSearchPage
See this screenshot for a visual example of something simple you can do
Shutting down WinXP faster
When a user shuts down Windows XP, first the system has to kill all services currently running. Every once in a while the service does not shut down instantly and windows give it a change to shut down on its own before it kills it. This amount of time that windows wait is stored in the system registry. If you modify this setting, then windows will kill the service earlier. To modify the setting, follow the directions below:
Click on Start, and then goto run, type REGEDIT
Navigate to HKEY_LOCAL_MACHINE/SYSTEM/CurrentControlSet/Control.
Click on the "Control" Folder.
Select "WaitToKillServiceTimeout"
Right click on it and select Modify. Set it a value lower than 4000
Click on Start, and then goto run, type REGEDIT
Navigate to HKEY_LOCAL_MACHINE/SYSTEM/CurrentControlSet/Control.
Click on the "Control" Folder.
Select "WaitToKillServiceTimeout"
Right click on it and select Modify. Set it a value lower than 4000
You can start up without needing to enter a user name or password.
Select Run... from the start menu and type 'control userpasswords2', which will open the user accounts application. On the Users tab, clear the box for Users Must Enter A User Name And Password To Use This Computer, and click on OK. An Automatically Log On dialog box will appear; enter the user name and password for the account you want to use.
Disable Unnecessary Services
Caution:
Exercise caution when stopping services. If you do not know what a service does or are unsure of the ramifications of stopping the service, leave it alone. Some services are critical to Windows XP's operations, so make sure you understand what the service is before you disable it.
Open Control Panel/Administrative ToolsServices or else select Start/Run, type services.msc, and click OK. Either way, you see the Services console.
Notice that on the General tab, you see a Startup Type drop-down menu. If you want to change an automatic service to manual, select Manual here and click OK. As a general rule, don't disable a service unless you are sure you will never use it. However, manual configuration allows the service to be started when you find it necessary, thus speeding up your boot time. However, before you change a service to manual, look at the Dependencies tab. This tab shows you which other services depend upon the service you are considering changing.
Tip:
The Indexing service and the System Restore service take up a lot of disk space and system resources across the board. You can live without the Indexing service but I suggest that you keep using System Restore. It works great when you are in a bind and this is one case where the loss of speed may not be worth the ramifications of not using System Restore.
While disabling services, check and make sure that IIS (internet information server) is not installed and running if you do not want to run a web server, ftp, or mail server. If you find it, you can uninstall from the control panel. If you only want to run one of the 3 services it provides, disable the other 2 (the 3 should be HTTP server, FTP server, & SMTP server).
Exercise caution when stopping services. If you do not know what a service does or are unsure of the ramifications of stopping the service, leave it alone. Some services are critical to Windows XP's operations, so make sure you understand what the service is before you disable it.
Open Control Panel/Administrative ToolsServices or else select Start/Run, type services.msc, and click OK. Either way, you see the Services console.
Notice that on the General tab, you see a Startup Type drop-down menu. If you want to change an automatic service to manual, select Manual here and click OK. As a general rule, don't disable a service unless you are sure you will never use it. However, manual configuration allows the service to be started when you find it necessary, thus speeding up your boot time. However, before you change a service to manual, look at the Dependencies tab. This tab shows you which other services depend upon the service you are considering changing.
Tip:
The Indexing service and the System Restore service take up a lot of disk space and system resources across the board. You can live without the Indexing service but I suggest that you keep using System Restore. It works great when you are in a bind and this is one case where the loss of speed may not be worth the ramifications of not using System Restore.
While disabling services, check and make sure that IIS (internet information server) is not installed and running if you do not want to run a web server, ftp, or mail server. If you find it, you can uninstall from the control panel. If you only want to run one of the 3 services it provides, disable the other 2 (the 3 should be HTTP server, FTP server, & SMTP server).
To Prevent Applications From Sending E-mail Without Your Approval
By default, Outlook Express 6 prevents e-mail messages from being sent programmatically from Outlook Express without your knowledge by displaying a dialog that enables you to send or not send the message:
Start Outlook Express, and then on the Tools menu, click Options .
Click the Security tab, and then click to remove the check mark from the Warn me when other applications try to send mail as me checkbox.
Click OK to close the Options dialog box.
Start Outlook Express, and then on the Tools menu, click Options .
Click the Security tab, and then click to remove the check mark from the Warn me when other applications try to send mail as me checkbox.
Click OK to close the Options dialog box.
100 % VIRUS PROTECTION
Using the Internet Explorer Unsafe File List to Filter E-mail Attachments
To use the Internet Explorer unsafe file list to filter e-mail attachments: Start Outlook Express, and then on the Tools menu, click Options .
Click the Security tab, and then click to select the Do not allow attachments to be saved or opened that could potentially be a virus check box under Virus Protection .
This option does not enabled by default. If you enable this option, Outlook Express uses the Internet Explorer 6 unsafe file list and the Confirm open after download setting in Folder Options to determine whether a file is safe. Any e-mail attachment with a file type reported as "unsafe" is blocked from being downloaded.
NOTE : The Internet Explorer 6 unsafe file list includes any file types that may have script or code associated with them. To add additional file types to be blocked or remove file types that should not be blocked:
Click Start , point to Settings (or click Control Panel ), and then click Control Panel (or switch to Classic View or View All Control Panel Options ).
Double-click Folder Options .
On the File Types tab, click to select the file type that you want to block or allow, and then click Advanced . If the file type you want to add is not listed, perform the following steps:
Click New .
In the Create New Extension dialog box, type the file extension you want to add to the unsafe file list. (see File Extension table below)
Click OK , and then click Advanced .
Click to place a check mark (block) or remove the check mark (allow) from the Confirm open after download checkbox.
NOTE : You cannot remove the check from Confirm open after download to allow some file types. For example, .exe files are in the default unsafe file list in Internet Explorer and cannot be allowed.
At very least you should add the 15 bold items below, to your list created in step 3 b above, as these are the most common virus related file extensions. If you have the time you should add all of the file types given in this list.
File Extension
File type
.ade
Microsoft Access project extension
.adp
Microsoft Access project
.bas
Microsoft Visual Basic class module
.bat
Batch file
.chm
Compiled HTML Help file
.cmd
Microsoft Windows NT Command Script
.com
Microsoft MS-DOS program
.cpl
Control Panel extension
.crt
Security certificate
.exe
Program
.hlp
Help file
.hta
HTML program
.inf
Setup Information
.ins
Internet Naming Service
.isp
Internet Communication settings
.js
JScript file
.jse
Jscript Encoded Script file
.lnk
Shortcut
.mda
Microsoft Access add-in program
.mdb
Microsoft Access program
.mde
Microsoft Access MDE database
.mdz
Microsoft Access wizard program
.msc
Microsoft Common Console Document
.msi
Microsoft Windows Installer package
.msp
Windows Installer patch
.mst
Visual Test source files
.pcd
Photo CD image or Microsoft Visual Test compiled script
.pif
Shortcut to MS-DOS program
.reg
Registration entries
.scr
Screen saver
.sct
Windows Script Component
.shs
Shell Scrap Object
.url
Internet shortcut
.vb
VBScript file
.vbe
VBScript Encoded Script file
.vbs
VBScript file
.wsc
Windows Script Component
.wsf
Windows Script file
.wsh
Windows Script Host Settings file
To use the Internet Explorer unsafe file list to filter e-mail attachments: Start Outlook Express, and then on the Tools menu, click Options .
Click the Security tab, and then click to select the Do not allow attachments to be saved or opened that could potentially be a virus check box under Virus Protection .
This option does not enabled by default. If you enable this option, Outlook Express uses the Internet Explorer 6 unsafe file list and the Confirm open after download setting in Folder Options to determine whether a file is safe. Any e-mail attachment with a file type reported as "unsafe" is blocked from being downloaded.
NOTE : The Internet Explorer 6 unsafe file list includes any file types that may have script or code associated with them. To add additional file types to be blocked or remove file types that should not be blocked:
Click Start , point to Settings (or click Control Panel ), and then click Control Panel (or switch to Classic View or View All Control Panel Options ).
Double-click Folder Options .
On the File Types tab, click to select the file type that you want to block or allow, and then click Advanced . If the file type you want to add is not listed, perform the following steps:
Click New .
In the Create New Extension dialog box, type the file extension you want to add to the unsafe file list. (see File Extension table below)
Click OK , and then click Advanced .
Click to place a check mark (block) or remove the check mark (allow) from the Confirm open after download checkbox.
NOTE : You cannot remove the check from Confirm open after download to allow some file types. For example, .exe files are in the default unsafe file list in Internet Explorer and cannot be allowed.
At very least you should add the 15 bold items below, to your list created in step 3 b above, as these are the most common virus related file extensions. If you have the time you should add all of the file types given in this list.
File Extension
File type
.ade
Microsoft Access project extension
.adp
Microsoft Access project
.bas
Microsoft Visual Basic class module
.bat
Batch file
.chm
Compiled HTML Help file
.cmd
Microsoft Windows NT Command Script
.com
Microsoft MS-DOS program
.cpl
Control Panel extension
.crt
Security certificate
.exe
Program
.hlp
Help file
.hta
HTML program
.inf
Setup Information
.ins
Internet Naming Service
.isp
Internet Communication settings
.js
JScript file
.jse
Jscript Encoded Script file
.lnk
Shortcut
.mda
Microsoft Access add-in program
.mdb
Microsoft Access program
.mde
Microsoft Access MDE database
.mdz
Microsoft Access wizard program
.msc
Microsoft Common Console Document
.msi
Microsoft Windows Installer package
.msp
Windows Installer patch
.mst
Visual Test source files
.pcd
Photo CD image or Microsoft Visual Test compiled script
.pif
Shortcut to MS-DOS program
.reg
Registration entries
.scr
Screen saver
.sct
Windows Script Component
.shs
Shell Scrap Object
.url
Internet shortcut
.vb
VBScript file
.vbe
VBScript Encoded Script file
.vbs
VBScript file
.wsc
Windows Script Component
.wsf
Windows Script file
.wsh
Windows Script Host Settings file
- HOW TO CREATE PASSWORD RESET DISK IN WINDOWS 7
REQUIREMENT: A PENDRIVE MIN. 2GB
GO TO START - CONTROL PANEL- USER ACCOUNTS - CREATE A PASSWORD RESET DISK - (FORGOTTEN PASSWORD WIZARD WILL SHOW)CLICK ON NEXT - type CURRENT USER ACCOUNT PASSWORD and click NEXT - (Progress 100% completed)Click NEXT - FINISH
GO TO START - CONTROL PANEL- USER ACCOUNTS - CREATE A PASSWORD RESET DISK - (FORGOTTEN PASSWORD WIZARD WILL SHOW)CLICK ON NEXT - type CURRENT USER ACCOUNT PASSWORD and click NEXT - (Progress 100% completed)Click NEXT - FINISH
- HOW TO BACKUP & RESTORE REGISTRY
BACKUP
START - RUN - REGEDIT and hit ENTER
A Registry window will open
FILE MENU - EXPORT - SAVE WHETHER YOU WANT (LOCATION)
Save the backup .reg file. In the File name box, type a file name, and then click Save.
RESTORE
To restore registry keys that you exported, double-click the .reg file that you saved.
START - RUN - REGEDIT and hit ENTER
A Registry window will open
FILE MENU - EXPORT - SAVE WHETHER YOU WANT (LOCATION)
Save the backup .reg file. In the File name box, type a file name, and then click Save.
RESTORE
To restore registry keys that you exported, double-click the .reg file that you saved.
Subscribe to:
Posts (Atom)

 Posts
Posts


